Wednesday, August 27, 2014

Summer Cilantro

I always seem to want cilantro the most when it is most difficult to grow, which is when the weather is the warmest. Anyone who has tried to grow cilantro in the summer knows that not long after it finally germinates it starts to bolt. This summer I've stumbled upon a method of growing cilantro in warm weather that may be able to meet my needs. I've started to sow it in clumps wherever I can find a sunny slice of soil in the garden. The southern edges of the beds seem to be a perfect spot. Here's a few clumps that I sowed a while back.


It's so easy to harvest cilantro when it is grown in a clump, just pull the entire thing. You can just cut the greens off and discard the roots, or with a bit more careful washing you can chop roots and all, the roots are tender and delicious when they are young.


It helps if you have a lot of seeds, 8 to 12 seeds per clump will deplete a typical packet of seeds pretty quickly. But fortunately it is so easy to save cilantro seeds, just let a few plants bolt and you'll never have to buy the seeds again. The added bonuses of attracting beneficial insects and collecting seeds as a spice should make it just about mandatory to find a spot to allow a few cilantro plants to bloom.


Now that the tomato and green chile pepper harvests are about to start in earnest here I might have enough cilantro for all the salsas and summery dishes that I love to enliven with its fresh flavor.

Monday, August 25, 2014

Harvest Monday - August 25, 2014

This week I harvested a new crop, my first ever ears of flint corn, aka Indian Corn. These are Cascade Ruby Gold, a variety bred for earliness and cold hardiness, not to forget flavor as well. There are ears from three different plants shown, the incomplete ear was the second ear on one of the plants and didn't get completely pollinated. I'll be including these in the tally as they get shelled, in the meantime I'm bundling them up and letting they finish drying indoors.


The eggplants are starting to roll in, I harvested 3 Bonica and a number of Salangana last week. I love the smoky flavor of eggplants roasted over a direct flame and made two different dishes last week with roasted eggplant. In one dish I chopped the roasted eggplant and mixed it with caramelized garlic, the very flavorful oil from the garlic, pomegranate molasses, fish sauce (too lazy to chop anchovies), pepper flakes and mint. Oh yum. The second preparation was very similar but a bit easier on the eyes, I tore the eggplant into strips and laid the strips on a platter and then prepared a dressing of garlic oil and pomegranate molasses, drizzled that over the eggplant, seasoned with salt and pepper  and sprinkled with mint leaves.


There are still scads of zucchini, these are Romanesco and Tromba d'Albegna, plus one Bonica eggplant that happens to have a big schnoz.


The Tromba d'Albegna squash vines are producing a number of male blossoms. I used these in a preparation inspired by a recipe in yesterday's SF Chronicle, I stuffed a cube of cheese into each blossom, then dunked them into an egg/milk mixture, dredged them in whole wheat flour and fried them until crispy. Sinfully delicious! (And while I was at it I took one of the Tromba squash, cut it into spears and gave it the same treatment, doubly sinful).


The small fruited tomatoes are starting to become abundant, from the top clockwise are Jaune Flamme, Isis Candy, and Sweet Gold. The Sweet Golds have an unfortunate tendency to crack if left on the plant too long. My project yesterday was to finally get all the ripe and overripe tomatoes off of that plant. All the salvageable cracked tomatoes went into a salad/salsa with melon and sweet red onion that accompanied the fried zucchini blossoms.


Lots of beans last week, here's one lot with all the uglies in view.


And one more basket of beans with all the beauties in view. This basketful will be the last one, at least for now, the plants are done producing but it looks like they are trying to pop out some new flowers so perhaps I'll get a second crop. I had an equal number of plants of both varieties growing on the same trellis, over the course of a month I harvested 6.5 pounds of Golden Gate and 8.6 pounds of Musica. The Musica beans started producing 4 days later than the Golden Gate but I pulled the last beans from both plants on the same day.


Oh my Padron pepper plants are happy this year! I harvested twice last week. I'm branching out from the traditional preparation of pan frying and serving as a tapa, the last two fritattas that I've made for my husband (his favorite lunch item) have each had half a pound of padrons in them. I've also started to include them in veggie sautes. And they are great added to your breakfast eggs, mmm, bacon and eggs and padrons...


And there are still plenty of cucumbers to be had, not too much and not too little.


One more shot of a typical harvest last week.


Not photographed is the basket of Tarbais beans that I've started to collect from the plants as they dry. Those are still waiting to be shelled and then they have to finish drying. And I also harvested more broccoli shoots and a bit of gai lan. I've had a difficult time getting gai lan to grow, my last sowing produced one plant which is thriving and surprising me by producing beautiful side shoots, something I didn't realize gai lan was prone to doing. If I had 5 or 6 plants I would be getting some nice harvests.

Here's the harvests for the past week:

Golden Gate beans - 1 lb., 11.2 oz.
Musica beans - 2 lb., 3.5 oz.
Di Ciccio broccoli - 2 lb., 4.6 oz.
Garden Oasis cucumbers - 1 lb., 4.2 oz.
Tasty Treat cucumbers - 2 lb., 5 oz.
Bonica eggplant - 3 lb., 6.1 oz.
Salangana eggplant - 3 lb., 3.2 oz.
Green Lance gai lan - 4.5 oz.
Red Candy Apple onions - 2 lb., 6.2 oz.
Padron peppers - 2 lb., 7.7 oz.
Isis Candy cherry tomatoes - 12.1 oz.
Jaune Flamme tomatoes - 1 lb., 10.9 oz.
Sweet Gold cherry tomatoes - 3 lb., 1.1 oz.
Romanesco zucchini - 6 lb., 1.2 oz.
Tromba d'Albegna zucchini - 3 lb., 3.8 oz.
Zucchini blossoms - 1.5 oz.

The total harvests from the garden last week were - 36 lb., 6.8 oz. (16.5 kg.)
Which brings the total harvests for 2014 up to - 530 lb., 9.1 oz. (240.7 kg.)

Harvest Monday is hosted by Daphne on her blog Daphne's Dandelions, head on over there to see what other garden bloggers have been harvesting lately.


Monday, August 18, 2014

Harvest Monday - August 18, 2014

I don't keep track of and generally don't bother to report on what are usually pretty minor harvests of fruit from my garden, but this past week I harvested two baskets of grapes. What's really remarkable about these grapes is that they are coming off of a vine that is totally neglected, in fact I never got around to properly planting it. It is sitting in a big plastic pot wedged up against a hedge of rosemary, it sent its roots through the openings in the bottom of the pot and is now happily sending its vines through the rosemary hedge. Last year it produced a few bunches of grapes that were consumed primarily by birds and rats. This year there are bunches of grapes hanging everywhere. The grapes are pretty small but they are flavorful. My lazy Dave doesn't want to bother with them though because the stems tend to break off with the grape and he doesn't like that. So I sat down and went through a couple of baskets of them, plucking off the grapes that hadn't split or been pecked at, then I dusted off my old dehydrator and now I've got a quart jar full of raisins.


Don't laugh, I know I've already got more zucchini than I can deal with, but I just couldn't resist trying another type of summer squash this year. That's the first Tromba d'Albenga squash of the season, you can tell that it didn't get pollinated because the bulb at the end is so small. This squash is a Curcurbita moschata, the same type of squash as butternut squash. These can be harvested at all stages of their development, from babies to be prepared as summer squash and any time until they turn into hard skinned winter squashes. In their winter squash form they are very much like butternut squash. This same squash goes by a number of names - Zucchino Rampicante, Tromboncino, Zucca d'Albenga. It is a vining plant so it can be trained up a trellis which is what I have done. The hanging trombone shaped squashes are quite attractive. And the squash is delicious with a nice firm texture since the seeds only form in the bulb at the end of the squash. Oh, and for those of you who are plagued by squash bugs , um borers, it's supposed to be resistant.


One more new thing from the garden is the first little Amish Paste tomato shown below between the eggplants and another Tromba squash.


The bean harvests are still generous and the cucumbers come in at a manageable pace.


I'm harvesting lots of Padron peppers.


The Sweet Gold cherry tomatoes are steadily ripening, yum these are good!


One morning I harvested all the blooming zucchinis.


Which were promptly turned into a Ricotta and Zucchini flan. I'm still not satisfied with the way this came out, it was good but not great. I'll keep working on this dish and when I get it right I'll post the recipe.


More of the usual suspects...

Golden Gate and Musica beans

Sweet Gold and Isis Candy cherry tomatoes
Garden Oasis cucumbers and Padron peppers


Romanesco zucchini

Ah, the first harvest from the new patch of Speedy Arugula.

Speedy arugula

And the first harvest of dried beans for the season.

Black Coco beans

Rosso di Lucca beans

Other harvests not photographed last week included more broccoli shoots, cutting greens, and onions which I've been weighing as I use them. I used part of the huge cauliflower I showed last week to make Smashed Cauliflower with Caramelized Garlic (thanks for the inspiration Dave V.). Sorry, I still need to write up the recipe and put it on my recipe blog.

Here's the details of the harvests last week:

Speedy arugula - 1 lb., .5 oz.
Golden Gate beans - 1 lb., 6.9 oz.
Musica beans - 2 lb., 4.8 oz.
Black Coco beans - 1 lb., 4 oz.
Rosso di Lucca beans - 1 lb., 3.9 oz.
Di Ciccio broccoli - 1 lb., 11.4 oz.
Tokyo Bekana napa cabbage - 1 lb.
Garden Oasis cucumbers - 1 lb., 8.3 oz.
Salangana eggplants - 1 lb., 14.4 oz.
Baby Portuguese kale - 7.3 oz.
Ruby Streaks mizuna - 2.9 oz.
Candy onion - 1 lb., 2.2 oz.
Purple Pac Choi - 6.5 oz.
Padron peppers - 1 lb., 8.9 oz.
Amish Paste tomato - 1.7 oz.
Isis Candy cherry tomatoes - 1.4 oz.
Jaune Flamme tomatoes - 8.1 oz.
Sweet Gold cherry tomatoes - 2 lb., .1 oz.
Romanesco zucchini - 6 lb., 7.8 oz.
Tromba d'Albegna squash - 3 lb., .7 oz.

The total harvests for the past week were - 29 lb., 11.7 oz. (13.5 kg.)
Which brings the total harvests for 2014 up to - 494 lb., 2.3 oz. (224.1 kg.)

Harvest Monday is hosted by Daphne on her blog Daphne's Dandelions, head on over there to see what other garden bloggers have been harvesting lately.

Saturday, August 16, 2014

Good Plant, Bad Bug

I hadn't intended to tackle this job today, not at all, it really could have waited, except that I found out that it couldn't. This part of the main path through the vegetable garden is still wood chips and plenty of things like to grow in wood chips. For the most part I keep the weeds pulled but I like to allow the bloomers that attract beneficial insects to volunteer here. Earlier in the year it was home to chamomile, then the Olive Leaf arugula which volunteers all around this end of the garden started to take over, and then my perennial favorite Sweet Alyssum filled in the gaps. It was getting to be a bit crowded, but I could still get through and the good bugs were feasting on the flowers.


This afternoon I was poking around in the alyssum to see what the sow bug population was like because they like to hang out in there during the day and when there's lots of them I toss in a little Sluggo Plus. The sow bugs weren't too bad but I spotted a bug that sent me inside ASAP to do a little research, I had a feeling... Oh crum, I guess it was just a matter of time before it showed up, the new bug turned out to be a nasty invader from Africa called a Bagrada Bug (Bagrada Hilaris). I had seen the pest alert issued by UC and I had also been contacted by caper grower in southern California who had a terrible infestation that ruined her caper crop. This bug's main host is anything in the mustard family. It feeds on many cole crops and other cruciferous plants and it's a huge agricultural pest where it has become established. It has already been found in Monterey county where I live but I hadn't seen it in my garden until today.

Bagarada Bugs doing IT (you know, IT)

It turns out that one of the plants that they are very much attracted to is Sweet Alyssum (I had no idea that it is in the brassica family). Indeed, one of the management techniques recommended by UC is to use traps baited with Sweet Alyssum. When I took a look at the Alyssum plants in the path I found scads of these bugs of all ages, adults were mating, little red nymphs were running for cover, they were EVERYWHERE. 


So I promptly mixed up a sprayer full of Pyganic/Insectcidal Soap mix. Pyganic is a pyrethrum based organic pesticide and the UC Bagarada Bug Management Guideline suggests that pyrethrum based treatments may suppress the adults. As I pulled the Bagarada Bug infested alyssum from the path and stuffed them into the big plastic bag that you see in the first photo I also took aim at all the BB's I saw and gave them a good spray. I also put the arugula into the bag because that's another plant that the BB's like to feed on. However, I did leave two clumps of alyssum as trap plants in the main path and the outside path where I had found more of the bugs. I've looked around the garden and so far I'm not seeing any of the bugs on the cruciferous plants in the garden. If they love the alyssum so much I'll leave a couple of plants to grow and I'll be checking them every day and eliminating any bugs that I see. I also checked my caper bushes and didn't see any in there either. It seems that the BB's prefer warm spots and they were loving the alyssum that was growing up against the walls of the beds that get full southern exposures. 

It saddens me that I'm going to have to limit the growth of Sweet Alyssum in my garden. It is a pretty plant and has been a reliable grower year round and is also very attractive to beneficial insects. Too bad it is also extremely attractive to one really bad bug.

Wednesday, August 13, 2014

Bean Scene 2014

This year is turning out to be a rather beany one. I'm growing 6 different varieties of snap beans and 5 varieties of dry beans. I continue to test the limits of the long growing season here, not always successfully. Last year I pushed the start date too hard by trying to get beans into the garden in March. The beans resented the cool weather and just did not want to grow. I ended up resowing some of them in April. And then I resowed the whole lot in May. Then I had problems with my drip lines clogging up so the new sowings didn't get enough water and again they struggled. My bean harvests last year started to trickle in at the end of June and didn't start in earnest until July.

Musica, Golden Gate, Royal Burgundy, Slenderette beans

This year I was a little more conservative about my start dates, the first bean seeds went into paper pots indoors on April 5 and 10 when I sowed Royal Burgundy and Classic Slenderette bush snap beans and Rosso di Lucca and Black Coco bush dry beans. Then  I made sure that my drip lines were working adequately and it probably helped a lot that we had a warmer than usual spring. Again, my bean harvests started toward the end of June with the first harvest of Royal Burgundy on June 20 and Slenderette on June 24, but I was spared the work and frustration of having to sow and resow. So April it is for the first sowing of beans around here.

Fagiolo del Purgatorio seedlings emerging

Here's the way I typically start all my beans, in pots made from newspaper. One tray will hold 36 pots and one of my trellises can be planted with 18 plants so I can sow two trellises worth of beans in one flat. I plant the pots out when all the beans have popped up that will emerge but before the roots have grown too far out the sides of the pots because they will start to grow into the neighboring pots and then it's difficult to pull the pots apart without damaging the roots. The heat mat really speeds things along so it's usually just a few days from sowing to emergence. When I first sow the beans I cover the entire tray with a sheet of plastic film to keep the pots from drying out, then I remove the plastic when the first cotyledons start to push out of the soil. I don't bother to use overhead lights because I set the pots out before the seedlings can get leggy. Even if they do get a bit leggy I've discovered that you can plant the seedlings up to the base of the cotyledons without harming the plants. Actually, I've found that if a stem gets chewed below the cotyledons that the plant can often be saved by bending the stem over and burying it up to the cotyledons and the base of the cotyledons will send down roots.  I can sow a flat of beans and have them out in the garden in about 5 to 7 days. The entire pot gets plunked into the soil and I always make sure that the rim of the pot is below the soil line so that it doesn't wick moisture away from the potting soil. The paper pot generally rots away by the time the plants are done producing.

Here's some views of the first round of beans back on June 3. Rosso di Lucca and Black Coco got off to a good start.

Rosso di Lucca and Black Coco, June 3
Royal Burgundy and Slenderette got off to a slow start, I lost a few plants to sowbugs and direct sowed a few replacements. The plants eventually came around and produced a good crop, 4.5 pounds of Royal Burgundys and 5.6 pounds of Slenderettes from an original planting of 9 plants of each, not all of which survived.

Royal Burgundy and Slenderette, June 3
I often have problems with birds uprooting the bean seedlings so this year I started my bush beans in a tunnel made from Micromesh. In the past I've used lightweight remay fabric, but the Micromesh allows more light and air so I gave it a try and it worked quite well. In the background you can see some remay that I erected around trellises where pole beans were getting started, again, for bird protection. I've found that it isn't necessary to completely enclose the seedlings planted at the base of a trellis, the birds don't seem to like getting into the enclosed space even though the top is open, that's great as it allows the seedlings to get more direct sun. More on those trellises further on.

Bean tunnel, June 3
The dry beans were nearly ready to pull by the end of July, the plants were full of dry and nearly dry bean pods. That's Rosso di Lucca in the foreground and Slenderette beyond. By this time I had opened up the tunnel because the birds were no longer a problem but spider mites and aphids with their attending ants had started to move in. Opening the tunnel allowed the beneficial insects better access to the bean plants which helped to slow down the infestations.

July 30


I pulled the Black Coco and Rosso di Lucca plants soon after and allowed them to finish drying spread out on some remay.

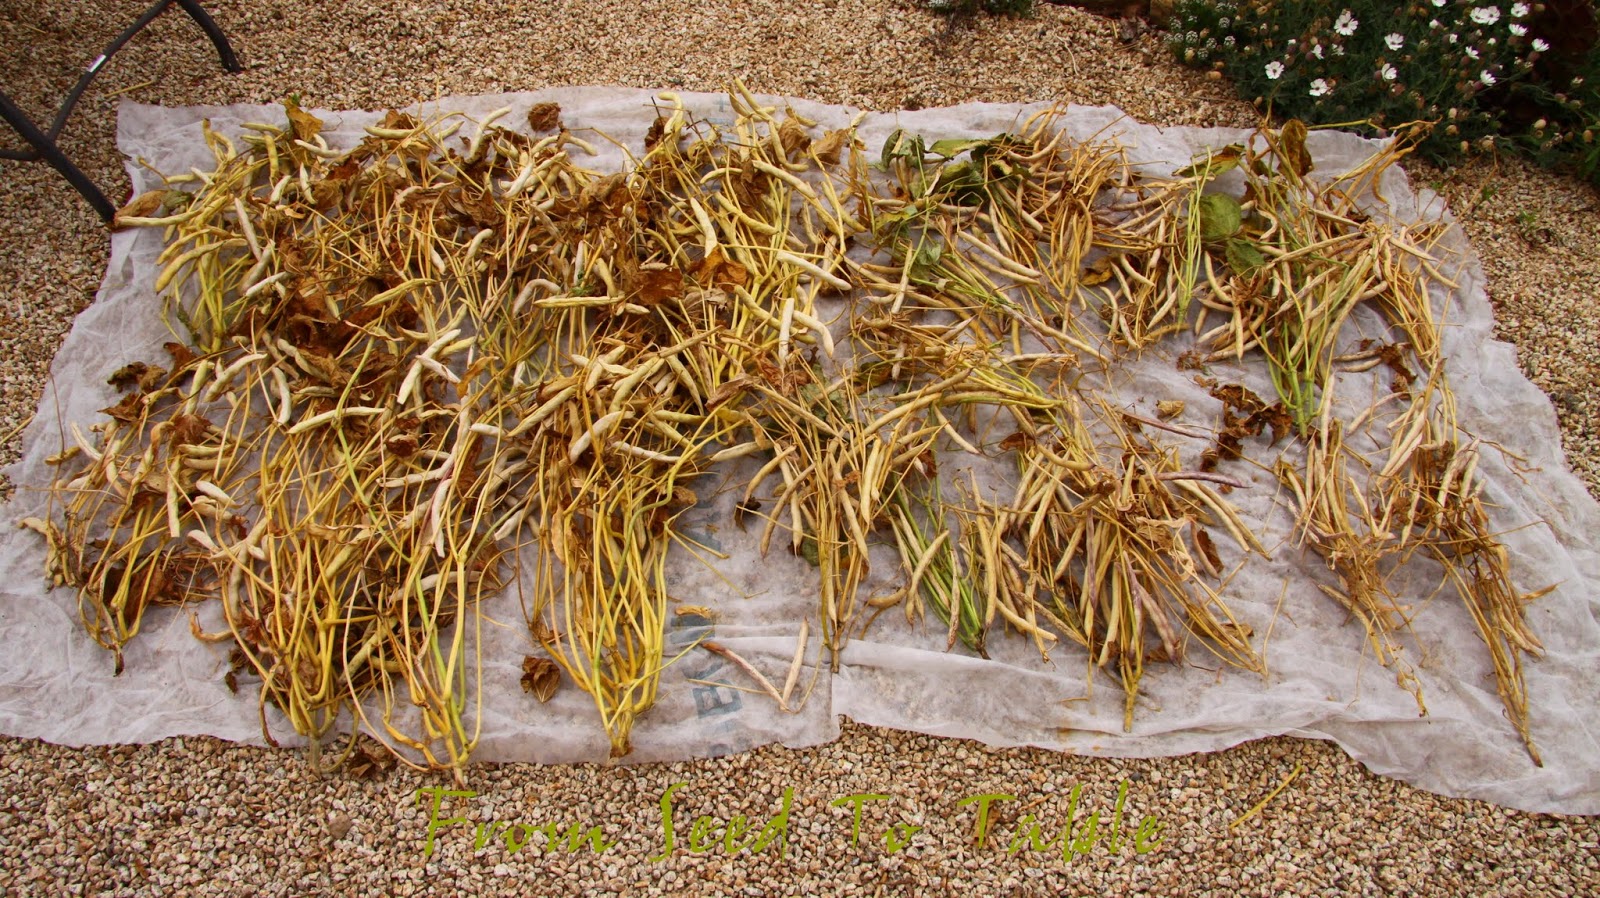
Black Coco and Rosso di Lucca plants drying, August 7
The beans finished drying rather quickly, in spite of being left outside during our foggy nights. I was rewarded with a nice basket full of dry pods.

August 10
I started off with 18 plants each of Black Coco and Rosso di Lucca and ended up with 1.3 and 1.2 pounds of shelled beans, respectively. That will be enough of each to see how I like them and then next year I can grow more if I want to. Aren't they both beautiful!

Rosso di Lucca and Black Coco beans, August 12

This year I'm pushing the limits of how late I might be able to sow both dry and snap beans. Here's a patch of Fagiolo del Purgatorio (Purgatory beans) that I sowed on July 18, with a few direct sown replacements that went in on the 29th. Last year I sowed a patch of Purgatory beans on July 17 and successfully harvested dry beans, so odds are that this bunch will produce.


Growing next to the new Purgatory beans are the Royal Burgundy and Slenderette beans which were full of spider mites and aphids.


Aphids on Royal Burgundy leaves and typical stippling from spider mite feeding.
The mites and aphids started migrating rather quickly over to the new Purgatory beans.

Stippling from spider mite feeding

The tiny specks are spider mites.

So I tore out the Royal Burgundy and Slenderette mite factories. Look though, they were still trying to pop out new blossoms, these babies didn't want to quit producing. After pulling the mite factories out I treated the Purgatory beans with a Pyganic/Insecticidal Soap treatment which seems to have knocked back the mites and aphids for now.


It was nice to see that roots on the old beans were full of nitrogen producing nodules (I do use an inoculant). I cut the top growth off and those went into the compost, the roots were dug back into the soil.


So the big test this year is - that tray of Purgatory beans that you see at the top of the post that I sowed on August 7, they are going into the space left when I pulled the Royal Burgundy and Slenderette beans, will they produce a crop of dried beans before cold wet weather sets in this fall? (Um, hoping for cold wet weather, at least WET weather, we desperately need it.)

Fagiolo del Purgatorio beans harvested in 2013
So, are you wondering why these beans are purgatorial? The name comes from the custom of eating them at lunch on Ash Wednesday at the Pranzo Purgatorio (Purgatory Lunch) in Gradoli, Italy. The beans have supposedly been grown in Gradoli for hundreds of years, although I do believe that Slow Food is mistaken in saying that these beans were grown by the Etruscans, which is not possible unless the Etruscans "discovered" the new world since these are Phaseolus vulgaris - a new world bean.

The trellises that I mentioned earlier are where I'm growing another dry bean and some romano type beans. The trellis shown below is covered with Tarbais beans which I sowed on May 8. This is my third? attempt (at least) at growing Tarbais beans, first from seeds that I mail ordered from France. Then another time with seeds that I got from a fellow gardener who brought them from France. I'm not sure if it was the seeds or me (probably me) but I've never been able to get them to grow well. I had pretty much given up on them but then I purchased a bag of Tarbais beans from Rancho Gordo who sourced their seed stock from France but grew them in California. I thought, what the heck, these were grown in California so maybe they'll grow in this part of California. Whoa, did they grow. The third photo below is of the plants yesterday full of nearly mature beans, the foliage is starting die back so it's looking a bit sparse but not long ago it was a seemingly impenetrable wall of green. I do believe that I'll get a nice crop of dried beans, fingers crossed. (The strange thing about these beans is that Rancho Gordo claims they are a runner bean Phaseolus coccineous which they clearly are not because the cotyledons did not remain in the soil when the beans sprouted. Which doesn't concern me since I've always understood that Tarbais beans are Phaseolus vulgaris anyway.)

Tarbais beans, June 17, with protective fabric enclosure

Tarbais beans, July 2


Tarbais beans, August 12

The other trellis in this bed is home to one of my all time favorite varieties of romano type beans, Spanish Musica, or just Musica. They are sharing space on the trellis with a new to me variety, Golden Gate, a brilliant yellow bean of similar shape and size. There's a photo of both beans at the top of the post. I sowed both of these beans on May 21 with the intention that they would start producing as the bush snap beans slowed down. Golden Gate was the first to produce starting on July 26 and Musica was not far behind with harvests starting on July 30. Since then I've harvested 3.9 pounds of Golden Gate and 4.9 pounds of Musica and harvests of both are continuing. It sure made it easier to pull out the bush beans with these beans in full production.

Musica and Golden Gate beans, July 2 


Musica and Golden Gate beans, July 27

I probably should have started the next succession of snap beans earlier, but I'm giving it a try anyway. If it takes about 2 months to go from sowing to harvesting or even a week or 10 days longer then I may be able to get some harvests from this sowing of Emerite filet and Australian Butter beans. That's if I can keep the melon vines from overrunning them and the birds and sowbugs from munching them. Last year I sowed these same varieties on July 8 and started harvesting the filet beans on September 4 and the Australian Butter beans on September 8.

Australian Butter and Emerite filet bean seedlings, August 12
There's one other bean that I'm growing this year, a somewhat local heirloom dry bean called Petaluma Gold Rush,  (Petaluma is about 160 miles north of here). The story behind this bean is that it was first brought to California in the early 1840's from South America and was the bean that fed the gold miners in the 1850's. I first read about this bean in William Woys Weaver's book 100 Vegetables and Where They Came From. And fortunately at that time Mr. Weaver was offering seeds for this bean through the Seed Savers Exchange member yearbook so I was able to get some seeds from him. This year I realized that I had not grown these out since 2010 so it was time to replenish my stock. I sowed a full flat of 36 seedlings on June 17, planted them out on the 24th, and they took off.

Petaluma Gold Rush beans, June 24

You can see in the photos here how I set up my trellises. Each one is a piece of concrete reinforcing mesh measuring 3 feet wide by 5 feet high which I attach to sturdy 7-foot stakes using UV resistant cable ties. Sometime I use shorter stakes and reinforce those by placing a 4-foot long 5/8-inch diameter rebar stake alongside each and lash the two together with cable ties. This method works perfectly in my large raised beds. I always install the trellises on the north side of the bed about 1 foot from the edge and plant the beans in two rows along either side of the trellis. I mentioned before that a half flat of paper pots fits perfectly along the length of one trellis, 9 plants along either side.

July 27
I usually erect a barrier of row cover around the trellis (see photo of Tarbais beans) to keep the birds from pulling the seedlings out, but this time I used a bunch of water bottles perched atop stakes to rattle around in the breeze (a pretty constant thing around here at this time of year). The movement and clanking of the bottles seems to deter the birds. As the vines grow up the trellis I weave a couple of stakes into the trellis and top them with water bottles to help keep the birds from pecking at the leaves. The birds always seem to go for the tender new leaves so I don't worry about the mature growth.

August 12
Petaluma Gold Rush beans have a pretty pink blossom.


Back in 2010 I grew a double trellis of Petaluma Gold Rush beans and ended up harvesting 7.7 pounds. This was the bulk of my harvest back in 2010.


I'm hoping for similar results this year. Stay tuned...